There is something special about a delicate cookie that practically melts in your mouth. These Parisian Cream Wafers bring together thin, buttery cookies and a smooth vanilla buttercream filling to create an elegant little treat that feels right at home on a dessert platter or afternoon tea table.

The wafer cookies are made with a simple combination of butter, heavy cream, flour, and a pinch of salt. After chilling, the dough is sliced into thin rounds and baked until just set. Once cooled, the delicate cookies are paired with a sweet, fluffy cream filling.
Although they look like something from a beautiful pastry shop, these homemade cream wafers are surprisingly approachable. The dough can be prepared ahead, the filling takes only a few minutes, and the finished sandwich cookies are perfect for holidays, celebrations, cookie exchanges, or a quiet afternoon treat.
Why You’ll Love These Parisian Cream Wafers
- Delicate buttery texture: The thin cookies have a tender, crisp bite that pairs beautifully with the creamy filling.
- Simple ingredients: You only need a few basic baking staples to make the wafers.
- Make-ahead dough: The dough can chill overnight, making baking day easier.
- Customizable filling: Vanilla, citrus zest, fruit jam, or cocoa can give the filling a different flavor.
- Beautiful presentation: These small sandwich cookies look lovely on a tea tray or dessert platter.
- Perfect for sharing: Their delicate size makes them a lovely addition to cookie boxes and special occasions.
What Are Parisian Cream Wafers?
Parisian Cream Wafers are delicate sandwich-style cookies made from thin, buttery wafers and a sweet cream filling. Their appeal comes from the contrast between the lightly crisp cookie layers and the soft, rich buttercream in the middle.
This homemade version uses a butter-and-cream dough that is chilled in logs and sliced into thin rounds before baking. The cookies are then cooled completely and sandwiched with vanilla buttercream.
The name gives these cookies an elegant pastry-shop feel, but the recipe is a homemade cream wafer variation rather than a claim to a specific traditional French pastry.
Ingredients You’ll Need
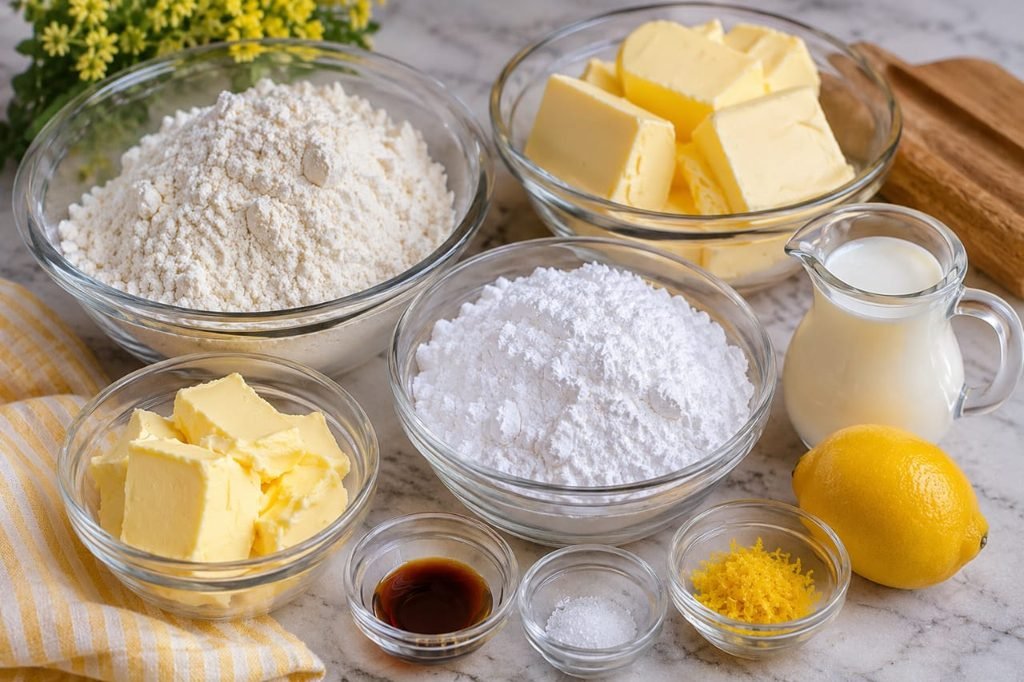
The ingredient list is short, so the quality and temperature of each ingredient matter. Use good unsalted butter and measure the flour carefully for the best texture.
For the Parisian Wafer Dough
- 1 cup (226g) unsalted butter, softened: Butter provides the rich flavor and tender texture of the wafers. Let it soften until pliable but not greasy.
- 1/3 cup (80ml) heavy whipping cream: Adds moisture and richness while helping bring the dough together.
- 2 cups (250g) all-purpose flour: Gives the cookies structure. Use the spoon-and-level method rather than packing flour into the measuring cup.
- A pinch of fine sea salt: Balances the richness of the butter and sweetness of the filling.
For the Cream Filling
- 3/4 cup (170g) unsalted butter, softened: Creates a smooth, rich buttercream base.
- 2 3/4 cups (330g) powdered sugar, sifted: Sweetens and thickens the filling.
- 1 teaspoon pure vanilla extract: Adds classic vanilla flavor.
- 1–2 tablespoons heavy cream or milk: Helps adjust the filling to a smooth, spreadable consistency.
Optional Flavorings
- Lemon or orange zest: Add 1 teaspoon of finely grated zest for a fresh citrus flavor.
- Fruit jam: Add a thin layer of raspberry or strawberry jam for a sweet-tart contrast.
- Cocoa powder: Mix in 1 tablespoon for a chocolate buttercream variation.
Kitchen Tools You’ll Need
- Electric hand mixer or stand mixer
- Large mixing bowls
- Plastic wrap
- Sharp, thin-bladed knife
- Two baking sheets
- Parchment paper
- Wire cooling rack
- Rubber spatula
- Measuring cups and spoons
How to Make Parisian Cream Wafers
The secret to these delicate cookies is keeping the dough cold, slicing it evenly, and avoiding overbaking. Follow each step carefully for wafers that hold their shape and pair beautifully with the creamy filling.
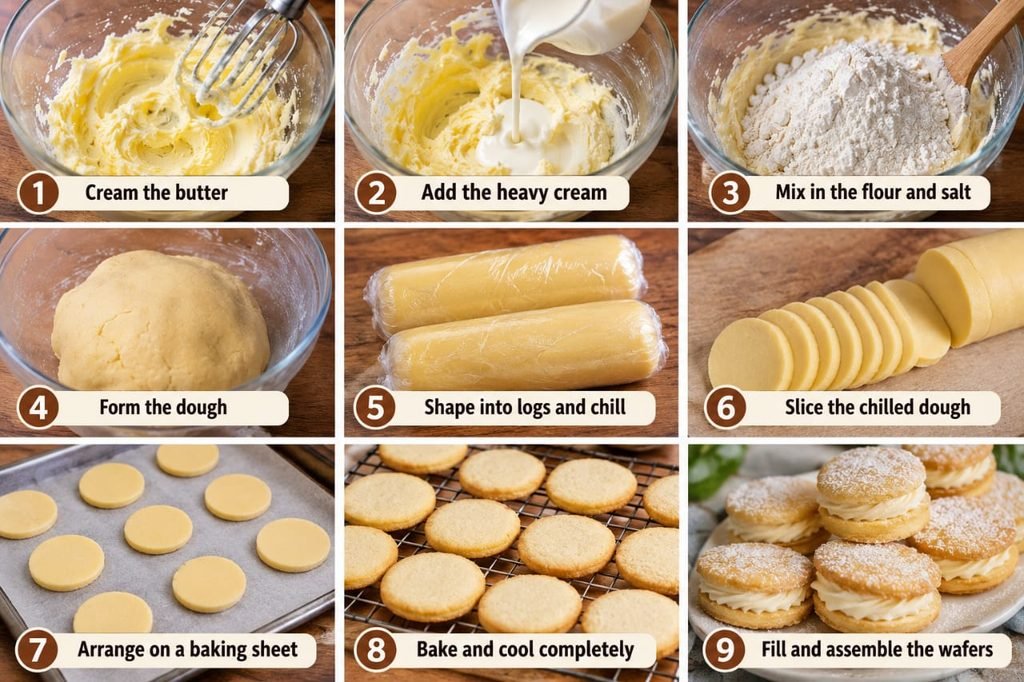
Step 1: Cream the Butter
Place the softened butter in a large mixing bowl. Beat with an electric mixer on medium speed for about 2–3 minutes, until smooth, pale, and creamy.
Scrape down the sides of the bowl as needed. The butter should be soft enough to mix easily but should not look melted or oily.
Step 2: Add the Heavy Cream
Reduce the mixer speed to low and gradually pour in the heavy whipping cream. Mix just until the cream is incorporated.
The mixture may look slightly uneven at this stage. That is fine. Avoid beating it for too long because the goal is simply to combine the ingredients.
Step 3: Mix in the Flour and Salt
In a separate bowl, whisk together the all-purpose flour and salt.
Add the dry ingredients to the butter mixture in two additions, mixing on low speed after each addition. Stop as soon as the flour disappears and a soft dough forms.
Do not overmix. Working the dough too much can develop gluten and make the finished wafers less tender.
Step 4: Shape and Chill the Dough
Divide the dough into two equal portions. Place each portion on a separate sheet of plastic wrap.
Use the plastic wrap to shape each portion into a smooth log about 1 1/2 to 2 inches in diameter. Roll the wrap tightly around the dough and gently even out the shape.
Refrigerate the wrapped logs for at least 4 hours, or preferably overnight. The dough needs to become very firm so that you can slice clean, even rounds.
Step 5: Preheat the Oven and Slice the Dough
Preheat the oven to 375°F (190°C). Line two baking sheets with parchment paper.
Remove one chilled dough log from the refrigerator. Using a sharp knife, cut it into rounds about 1/8 to just under 1/4 inch thick. Aim for approximately 5mm thickness and keep the slices as uniform as possible.
If the dough is too firm and cracks while slicing, let it sit at room temperature for about 5–10 minutes before continuing.
Keep the second dough log refrigerated until you are ready to slice it.
Step 6: Bake the Wafers
Arrange the dough rounds on the prepared baking sheets, leaving about 1 inch between them.
Bake for approximately 7–9 minutes, checking early because thin cookies can bake quickly. The wafers should look set, with only the slightest hint of pale golden color around the edges.
Do not wait for the cookies to become deeply golden brown. Overbaking can make them too dark and take away their delicate buttery flavor.
Step 7: Cool Completely
Remove the baking sheets from the oven and allow the wafers to rest for about 5 minutes. They will be fragile while warm, so avoid moving them immediately.
Carefully transfer the cookies to a wire rack and let them cool completely before adding the filling. The wafers become firmer as they cool.
Step 8: Prepare the Vanilla Cream Filling
Place the softened butter in a clean mixing bowl. Beat on medium speed until smooth and fluffy.
Gradually add the sifted powdered sugar, about 1/2 cup at a time, mixing well after each addition. Add the vanilla extract and continue beating for 2–3 minutes until the filling is light and creamy.
If the buttercream feels too thick, add heavy cream or milk a little at a time until it reaches a spreadable consistency.
If you want a citrus, fruit, or chocolate variation, add your chosen flavoring and mix until evenly combined.
Step 9: Pair and Fill the Wafers
Once the wafers are completely cool, arrange them in pairs of similar size. This makes it easier to create neat sandwich cookies.
Turn one wafer from each pair flat-side up. Spoon or pipe approximately 1–2 teaspoons of cream filling onto the center, depending on the size of the cookie.
Step 10: Assemble the Sandwich Cookies
Place the matching wafer on top of the filling, flat-side down. Press gently until the cream spreads toward the edges.
Be careful not to squeeze too hard. These cookies are delicate, and too much pressure can crack the wafers.
Repeat with the remaining cookies. Let the filling settle briefly before arranging the finished wafers on a serving plate.
Expert Tips for Perfect Cream Wafers
- Use properly softened butter: Butter that is too cold will not mix smoothly, while melted butter can change the dough texture.
- Measure flour accurately: Too much flour can make the wafers dry and heavy. Spoon flour into the measuring cup and level the top.
- Chill the dough thoroughly: Firm dough is much easier to slice into neat rounds.
- Use a sharp knife: A sharp blade cuts through the chilled dough without crushing it.
- Keep the slices even: Uniform thickness helps the cookies bake at the same rate.
- Watch the oven closely: Begin checking at 7 minutes. The wafers should remain pale and should not become deeply browned.
- Cool before filling: Warm cookies can soften or melt the buttercream.
- Adjust the filling gradually: Add cream or milk a teaspoon at a time to avoid making the buttercream too loose.
Common Mistakes and How to Fix Them
Why Is My Dough Too Soft to Slice?
The dough may not have chilled long enough, or the butter may have been too warm when you started. Return the wrapped dough to the refrigerator until firm. If your kitchen is warm, work with one log at a time and keep the other chilled.
Why Are My Wafers Cracking?
Very cold dough can crack when sliced, especially if the knife is dull. Let the log rest for 5–10 minutes at room temperature and use a sharp knife. Slice with a steady motion rather than pressing down too hard.
Why Did My Cookies Turn Brown?
Thin wafers can overbake quickly. Your oven may also run hotter than its displayed temperature. Check the cookies at the 7-minute mark and remove them once they are set with only a slight hint of color at the edges.
Why Is My Filling Too Runny?
The butter may have been too warm, or too much cream or milk may have been added. Refrigerate the filling briefly if it feels overly soft, then beat it again until spreadable. Add extra powdered sugar gradually if needed.
Why Are My Sandwich Cookies Breaking?
The wafers are naturally delicate. Make sure they have cooled completely and use a small amount of filling. Press the top wafer gently instead of squeezing the sandwich together.
Easy Flavor Variations
The vanilla buttercream is a lovely classic filling, but these delicate wafers are also delicious with a few simple flavor changes.
Lemon Cream Wafers
Add 1 teaspoon of finely grated lemon zest to the buttercream. The fresh citrus flavor balances the richness of the butter and creates a bright, elegant filling.
Orange Vanilla Cream Wafers
Use finely grated orange zest in the filling along with the vanilla extract. This gives the cookies a gentle citrus aroma that pairs beautifully with afternoon tea.
Raspberry Cream Wafers
Spread a very thin layer of raspberry jam over the buttercream before sandwiching the cookies. Use a seedless jam if you prefer a smoother texture.
Chocolate Cream Wafers
Add 1 tablespoon of sifted cocoa powder to the buttercream. Beat until smooth and adjust the consistency with a little cream if necessary.
Almond Cream Wafers
Replace part or all of the vanilla extract with almond extract. Start with a small amount because almond extract has a strong flavor.
How to Store Parisian Cream Wafers
These cookies are best stored carefully because their delicate texture can change as the filling sits between the wafers.
At Room Temperature
For short-term serving, keep the cookies in a cool room in an airtight container. Because the filling contains butter and dairy, avoid leaving them in a warm environment for extended periods.
In the Refrigerator
Place the assembled wafers in a single layer or separate layers with parchment paper in an airtight container. Refrigerate for up to 3 days for the best quality. Allow them to sit briefly at room temperature before serving if you prefer a softer filling.
Can You Freeze Cream Wafers?
Yes. For the best texture, freeze the unfilled wafers separately in an airtight freezer-safe container for up to 2 months. Thaw them at room temperature before filling.
You can also freeze assembled cookies in a single layer before transferring them to a sealed container. Keep in mind that the wafer texture may soften slightly after thawing.
Can You Make the Dough Ahead?
Absolutely. The dough logs can be prepared and refrigerated overnight, which makes this recipe convenient for busy baking days.
You can also freeze the wrapped dough logs for longer storage. Thaw them in the refrigerator until firm enough to slice, then bake as directed.
What to Serve with Parisian Cream Wafers
These elegant little cookies pair beautifully with simple drinks and other light desserts.
- Hot tea: Black tea, Earl Grey, or green tea complements the buttery cookies.
- Coffee: Serve with espresso or a mild latte for an afternoon treat.
- Fresh berries: Strawberries and raspberries add a refreshing contrast.
- Fruit preserves: A little extra raspberry or strawberry jam makes a lovely accompaniment.
- Holiday dessert platters: Arrange the wafers with shortbread, chocolate cookies, and other small treats.
Frequently Asked Questions
Are Parisian Cream Wafers the same as regular wafer cookies?
They are a type of cream-filled sandwich cookie, but their homemade texture is different from thin commercial wafer sheets. This recipe uses a butter-and-cream dough that is baked into delicate rounds and filled with buttercream.
Why does the dough need to chill for so long?
Chilling firms the butter and makes the dough easier to slice. It also helps the rounds maintain their shape during baking. At least 4 hours is recommended for this log-shaped version.
Can I make these cookies without a stand mixer?
Yes. A hand mixer works well for both the dough and filling. You can also mix the dough by hand with a sturdy spoon, taking care not to overwork it.
Can I use salted butter?
Unsalted butter is recommended because it gives you better control over the salt level. If you use salted butter, omit the additional pinch of salt in the dough.
Can I make the wafers thinner?
Yes, but slice carefully and keep the thickness consistent. Thinner wafers may bake faster, so start checking them earlier than the suggested baking time.
How do I keep the wafers crisp?
Cool the cookies completely before filling, store them in an airtight container, and avoid adding too much filling. Keep in mind that the moisture from the buttercream will gradually soften the wafers over time.
Can I color the cream filling?
Yes. A small amount of gel food coloring can tint the buttercream for holidays, birthdays, baby showers, and other celebrations. Add it gradually until you reach the color you want.
Can I use jam instead of buttercream?
Yes. A thin layer of raspberry or strawberry jam can be used alone or together with the buttercream. Avoid adding too much jam because excess moisture can soften the wafers.
Final Thoughts
These Parisian Cream Wafers are a lovely reminder that simple ingredients can create something truly special. Their delicate buttery cookies and smooth vanilla filling make every bite feel elegant without requiring complicated pastry techniques.
With a little patience during chilling and careful attention while baking, you can create beautiful homemade sandwich cookies that are perfect for sharing. Try the classic vanilla filling first, then experiment with lemon, raspberry, chocolate, or almond flavors.
Serve them with a cup of tea or coffee, add them to a holiday cookie platter, or package them as a thoughtful homemade gift. However you enjoy them, these delicate cream wafers are sure to make any occasion feel a little more special.